Artmaking – Part 4 – Photography
This sequence allows the students to explore the postmodern frame to question and challenge the artmaking processes while creating a collection of works.
Students will explore appropriation and compare traditional and contemporary conventions in art making. Students will investigate whether various artworks are documented forms, photomedia or a collection of works. Students will discover how these artmaking practices overlap and define one another.
Outcomes
- 4.1 uses a range of strategies to explore different artmaking conventions and procedures to make artworks.
- 4.2 explores the function of and relationships between the artist - artwork - world - audience.
- 4.3 makes artworks that involve some understanding of the frames.
- 5.1 develops range and autonomy in selecting and applying visual arts conventions and procedures to make artworks.
- 5.2 makes artworks informed by their understanding of the function of and relationships between the artist - artwork - world - audience.
- 5.3 makes artworks informed by an understanding of how the frames affect meaning.
Duration
3 weeks.
Driving question
How does an audience decide whether an artwork is valuable or invaluable?
Content
Students will reference traditional practices of modernism through drawing and painting. Students will create an appropriation using photomedia procedures and conventions. They will analyse a collection of work and reflect on their artmaking.
- Numeracy
- Civics and citizenship
- Information and communication technology.
Assessment
All activities require students to demonstrate their learning and are all assessment for learning activities.
Teaching and learning activities
Students are to use their process diary to investigate and answer the driving question through a series of exercises.
Students will
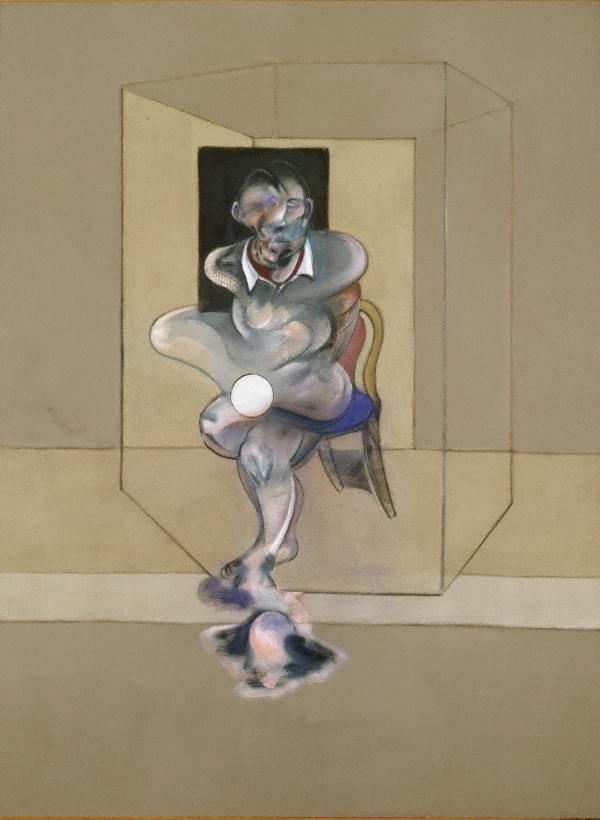
- imagine they are at the Art Gallery of NSW looking at the current display of expressionism artworks within the halls of the modernism gallery. You stumble across Francis Bacon, Study for self-portrait,External link 1976 and examine the artwork. What are your initial reflections:
- Have you seen this work before?
- What does it remind you of?
- Do you like the artwork? Why or why not?
Students will:
- discuss the postmodern frame and define it. The Visual arts frames infographic (PDF 5.57 MB) is available to assist you with this.
- write in their books how the postmodern frame could alter the perception of Francis Bacon's artwork?
- watch the first 2.30 minutes of the youtube clip art movementsExternal link. Initiate a discussion and define a movement with students
- research the background and style of modernism
- read through the Modernism powerpointExternal link
- write a short speech and create an accompanying mind map explaining how modernism is defined as a movement
- brainstorm a list of other movements
- in groups, select artwork from a particular movement. For example, Expressionist movement - Edvard Munch, The Scream, 1893.External link
- annotate the artwork by identifying compositional features within the image for meaning. An example of this can be viewed in the short clip Edvard Munch, The Scream.External link
Within groups, students will appropriate a traditional artwork, featuring themselves.
Following the steps below, students will work in groups to enlarge the artwork through drawing and painting skills.
Students will:
- print out an A4 copy of the image for reference. Colour is preferable, however, black and white will enable students to scale draw the picture using a grid
- rule a 3 x 3 grid over the image
- use a large paper (no smaller than A1) to rule the same 3 x 3 grid using pencil, in the same orientation as the image. That is, portrait or landscape
- use the margins of each square to copy one section of the artwork at a time to proportion, in pencil drawing. Students measure details of composition position through focusing on each square at a time
- once the details are drawn to scale, students can paint the colours in over the drawing. Rub out the grid lines before initiating this process to ensure they do not show through the paint.
Students will:
- use the internet to research the work of Anne Zahalka.
- select an image and additional appropriated version
- compare and contrast the picture with the appropriated image using a Venn diagram identifying the similarities and differences.
- answer the following questions in their books -
- What are the differences in the images?
- Does the meaning change when comparing the two images?
- Why did the artist do this?
- get into groups, recreate and photograph themselves copying the artwork
- complete the exercise above, addressing each dot point below
- hair, makeup and costuming
- positioning for perspective within the composition
- facial expression and body language as features to change the meaning of the artwork.
- photograph the appropriation of the artwork and share with the class.
Written responses are documented and shared within collaborative discussion facilitated by the teacher.
Students will:
- document the process of their artmaking within a journal. This can be their visual arts process diary or an online blog through sites such as Google classroom.External link
- photograph or sketch the process used
- write a response about the process.
Differentiation
Extension
Students will:
- look at the work of Barbara Kruger
- analyse the use of text within her photograph
- write an essay related to the quote 'we will not become what we mean to you' by looking at the attached resource by the Art Institute of ChicagoExternal link
- use filters within photoshop to manipulate the images created above further by incorporating text within the image. The Introduction to Photoshop handout (PDF 4.34 MB) can assist with this
- create a stop-motion film using the images above.
Life skills
Outcomes
- LS 2 explores a variety of materials, techniques and processes.
Students will:
- trace an appropriated artwork composition using pencil only
- discuss the colours and meaning of the original artwork
- explain how colours can affect meaning
- paint a composition using one set of colours, then paint it again using another set to change its meaning.
Evaluate
Feedback is formative for the duration of the project.
This sequence and accompanying worksheets are available as word documents below.
- Brian Reverman, Art Movements? What they '-ism'. What they ain't, 2015.External link date accessed, 06/06/17.
- 'History of modernism' weblinkExternal link date accessed, 06/06/17.
- One minute art, Edvard munch - the scream, 2014.External link date accessed, 06/06/17.
- 'We will not become what we mean to you' resourceExternal link date accessed, 06/06/17.
Syllabus
Please note:
Syllabus outcomes and content descriptors from Visual Arts 7–10 Syllabus (2003)External link © NSW Education Standards Authority (NESA) for and on behalf of the Crown in right of the State of New South Wales, 2017.